· 13 min read
Using a .Net Web API connected to SharePoint Lists using Delegated Permissions in a Microsoft 365 Declarative Agent with API Plugin with Single Sign On
I am going to talk and walkthrough building a Web API that connects to SharePoint Lists with PnP Core SDK and integrate this into Microsoft 365 Copilot Declarative Agent with API Plugin (actions) using Delegated permissions and Single Sign On (SSO).

Introduction
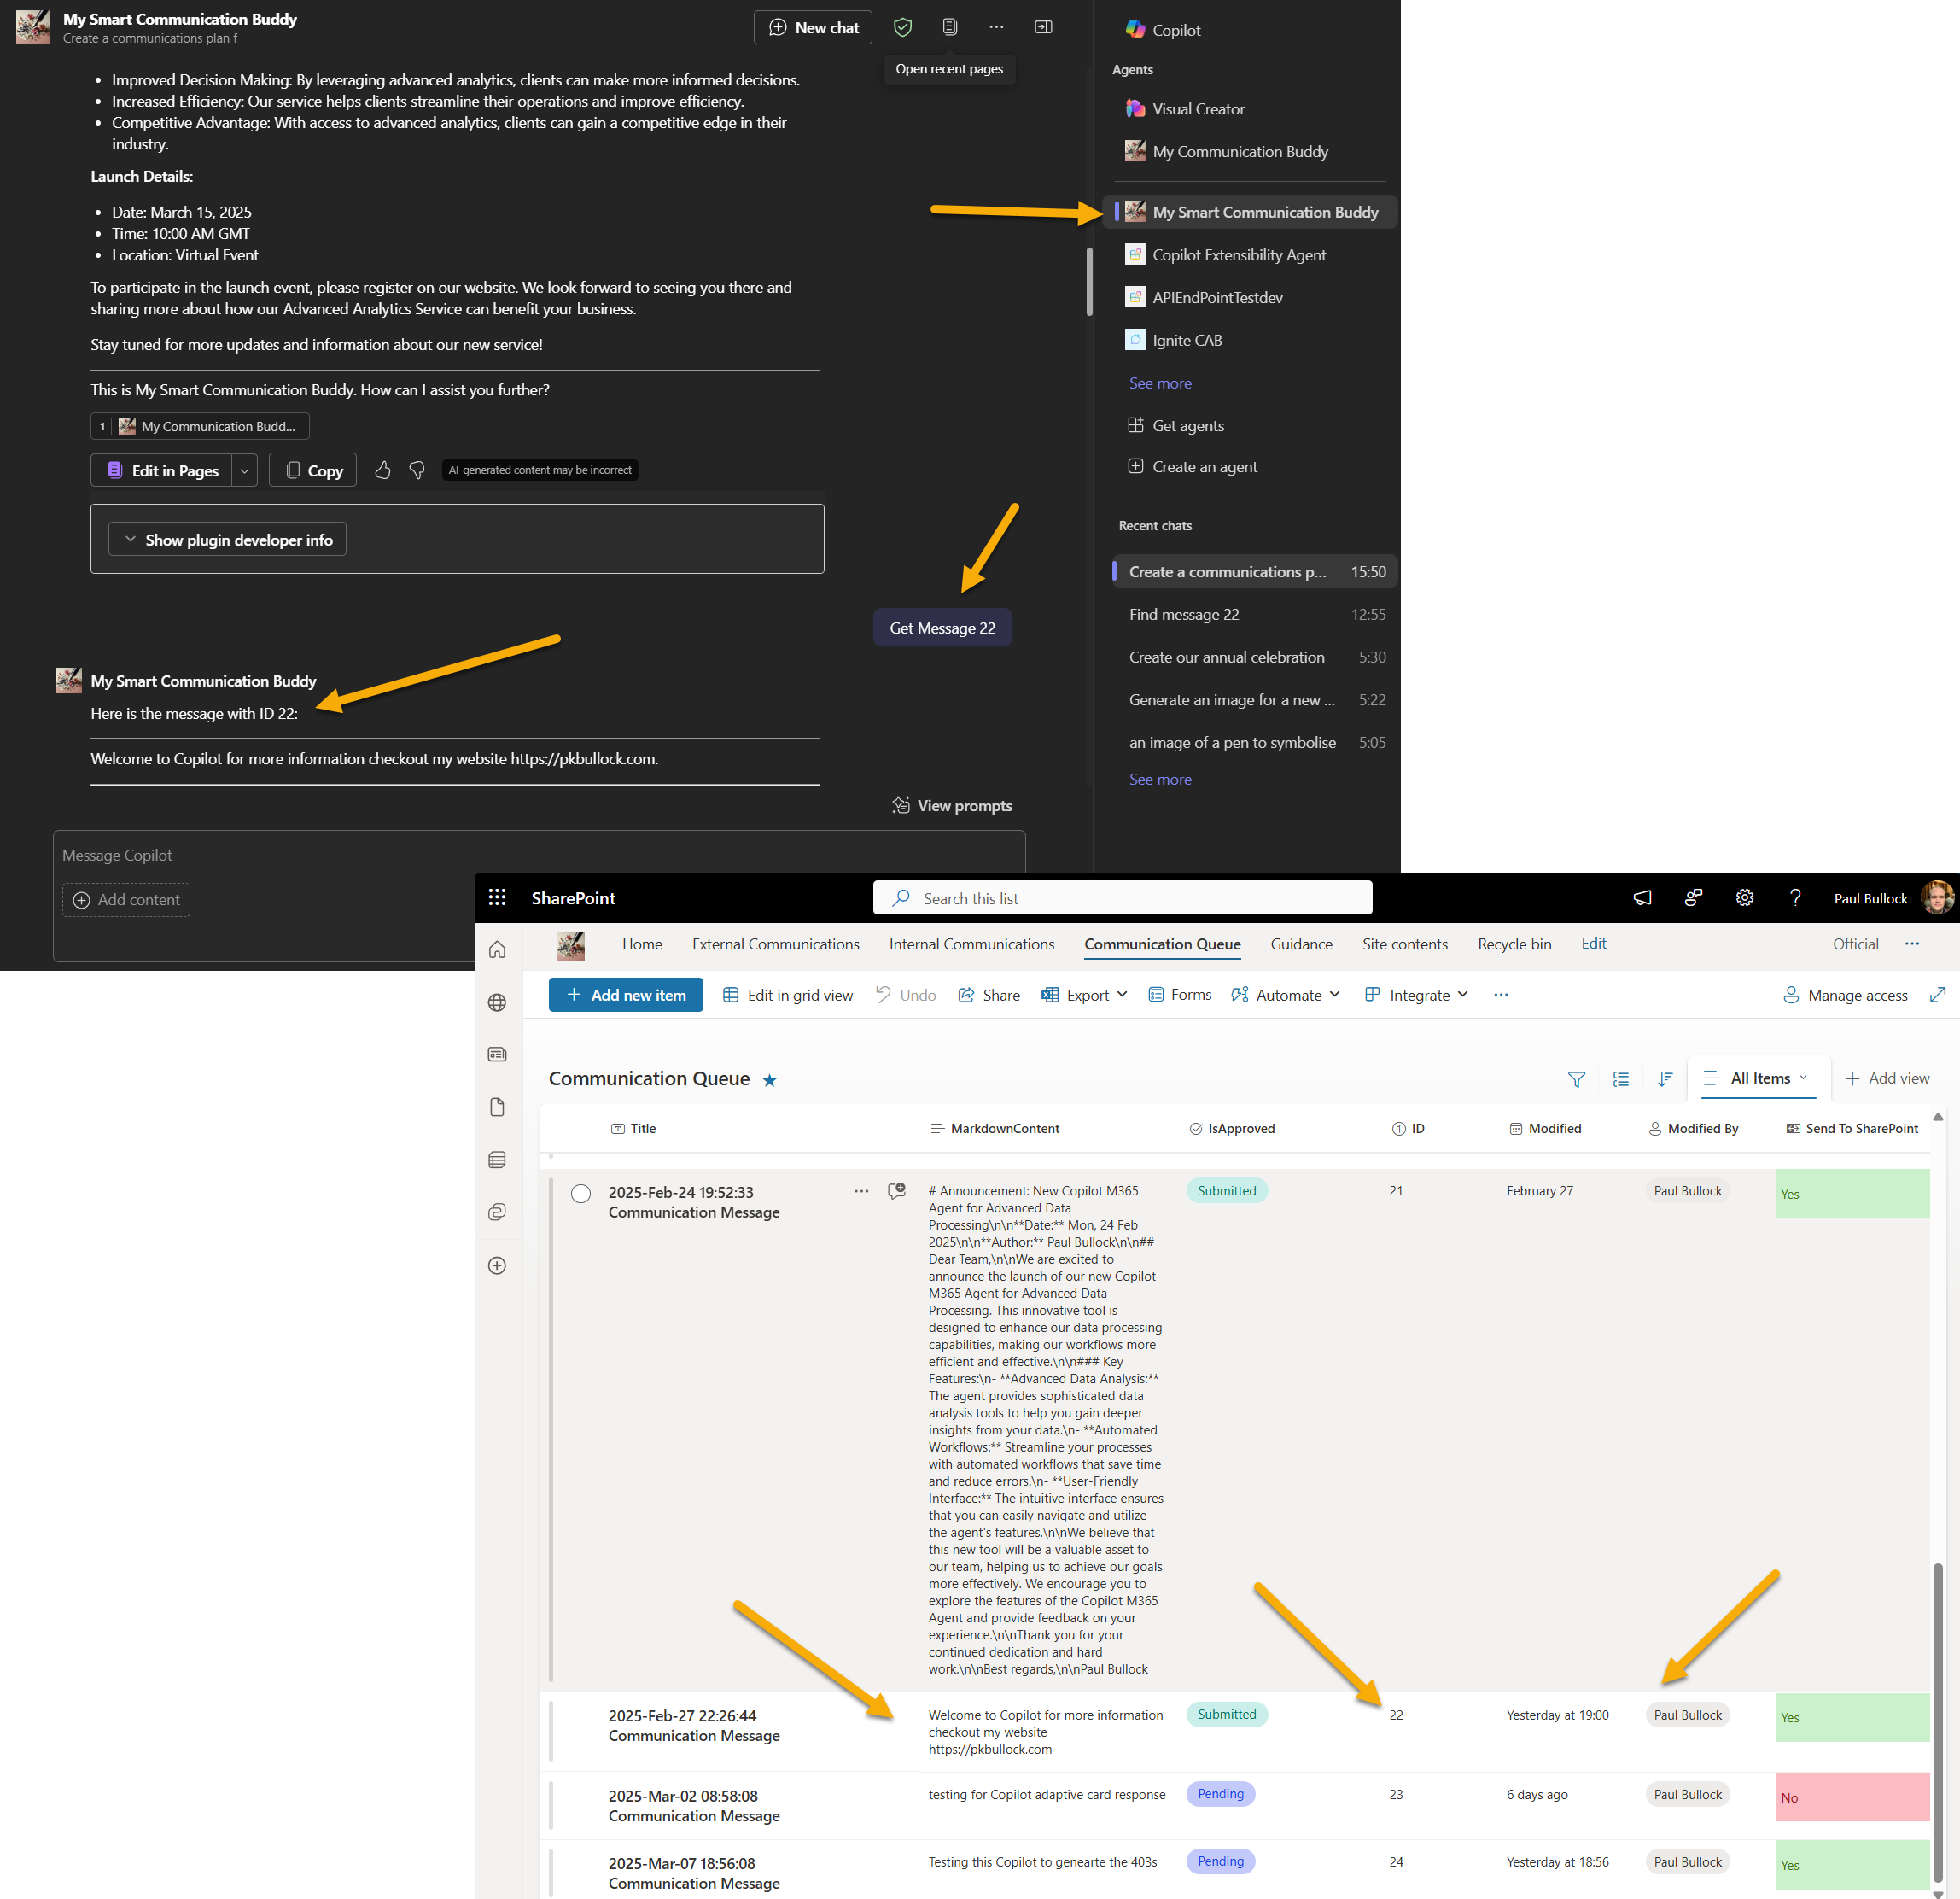
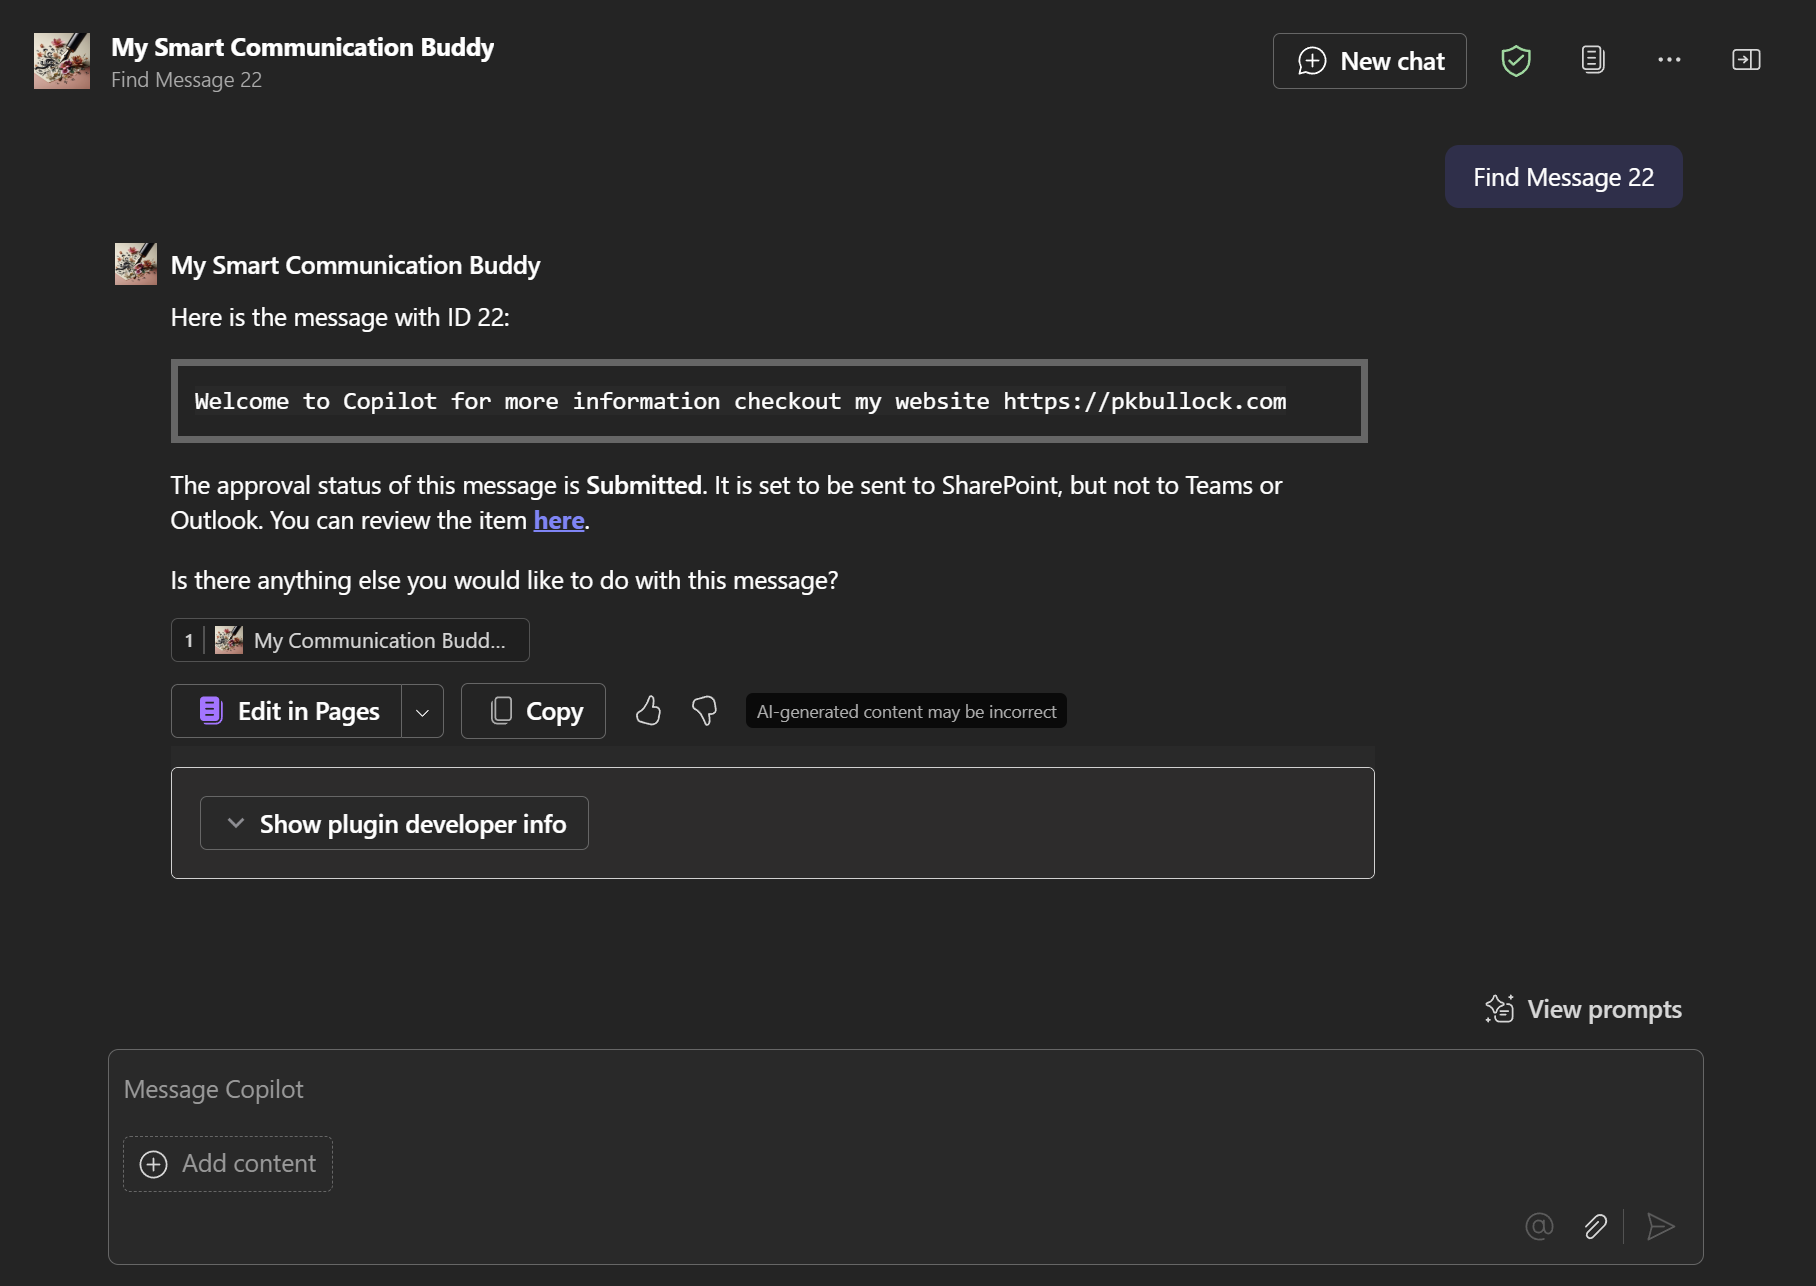
The business scenario I refer to here is a Communications Buddy, Microsoft 365 Copilot designed to help staff to create great communications, extending another smaller sample for a declarative agent but this time with the ability to provide capabilities to perform actions.
This has been extended an with API Plugin, allowing me to add actions to the agent the Copilot can call upon, the action in our case here will write data to a SharePoint list where the user has permissions to access. My demonstration here is to have a relatively secure configuration to show all the various points to set this up.
This was much of a learning exercise for me to keep skills sharp and up to date but to create a useful sample for future me and others to use in the community.
The Web API using .NET and PnP Core SDK
Personally, I quite like working with .Net over Node.Js applications, so took the opportunity to update knowledge by using .Net 9 as well.
For this application, I am using the Visual Studio to write the API.
For this section, I started with a scaffolded Web API using controllers. When integration into Microsoft 365 Copilot, you can use other types of APIs, but for writing one yourself, you need to consider the following:
- Operations, carefully using GET, POST, PATCH accordingly.
- Generate an Open API v2/3 specification, for this example, I had ensured that the properties are generated inline.
- Authentication approach, for example No Authentication, API Key, OAuth V2 or Microsoft Entra SSO client ID registration. Personally, SSO is the best option for user experience and ensuring you are not handling credentials.
- How it is connecting to SharePoint, I have used PnP Core SDK v1.14.0, but I want to use delegated permissions and not to have a separate authentication meaning that operations using and referencing the permissions of the user, not the app.
- Hosted in Azure, local is fine, but lets see this hosted too.
Other considerations for the Web API itself:
- Database for token storing, this isn’t super secure and there ARE better methods, but I was having issues and wanted to see what was happening under the hood. This used managed identity to connect between the web app and SQL database for best way to manage credentials and connections. There is a nice tool in Azure Web Apps called “Service Connectors” that configure the database connections, just remember to assign permissions to the managed identity on the database.
- Use Mocking Service - to allow me to decouple the SharePoint dependency during development and with debugging sessions.
The API operations, I have written are:
- GetMessages: Retrieves all messages.
- GetMessage: Retrieves a specific message by its unique identifier.
- CreateMessage: Creates a new message.
- UpdateMessage: Updates an existing message.
- CancelMessageApproval: Cancels the approval of a message.
- SubmitMessageApproval: Submits a message for approval.
This aligns to a process, that the user wants to draft a message, save to SharePoint and trigger a approval flow. The flow itself is not scoped for this application but by using SharePoint, you are free to add Power Automate or Logic apps on the list to take it to the next step in the business process.
Code Walkthrough
Within the project, the following key areas that provide the functionality of the API are:
PnPContextFactory.csto use dependency injection into the pass the authentication (ITokenAcquisition) from the .Net Web API auth to PnP Core SDK without having use separate access tokens.WebAPICustomPnPProvider.csthis class authenticates HTTP requests by acquiring access tokens with specific scopes, using Microsoft Identity Web’s ITokenAcquisition service and logs the process.- Models for passing strongly typed objects through the application
- Controller for the message API endpoints
- Services
MockMessageService.cslightweight mocking the SharePoint interactionPnPSharePointMessageService.csthe main class for connecting to SharePoint using the authentication of the user to read, write and update data to a SharePoint List.
Program.csconfigures and runs the ASP.NET Core web application, setting up services such as authentication, token acquisition, caching, dependency injection, logging, and OpenAPI documentation, and defines the HTTP request pipeline and exception handling.Message.csmodel for the messages sent and received by the API- Id - the unique identifier of the message.
- MarkdownContent - the title of the message.
- Approval - Gets or sets the approval status of the message.
- SendToSharePoint - value indicating whether the message should be sent to SharePoint.
- SendToTeams - value indicating whether the message should be sent to Teams.
- SendToOutlook - value indicating whether the message should be sent to Outlook.
- ReviewItemUrl - the URL of the item to be reviewed.
There is a code tour on the repo (open the app with Visual Studio Code, if you want to see the details on how this works), this will be much easier to explain than here.
Pending merge, but here is a sneaky peak: My Advanced COmmunications Buddy Pull Request | GitHub - check out the API folder.
I have used the samples within the PnP Core SDK repo for reference - these are an excellent place to learn.
Entra ID App Configuration
For the Web API Sample, I have used a single Entra ID app, that contains the API permissions and the Single Sign On configuration.
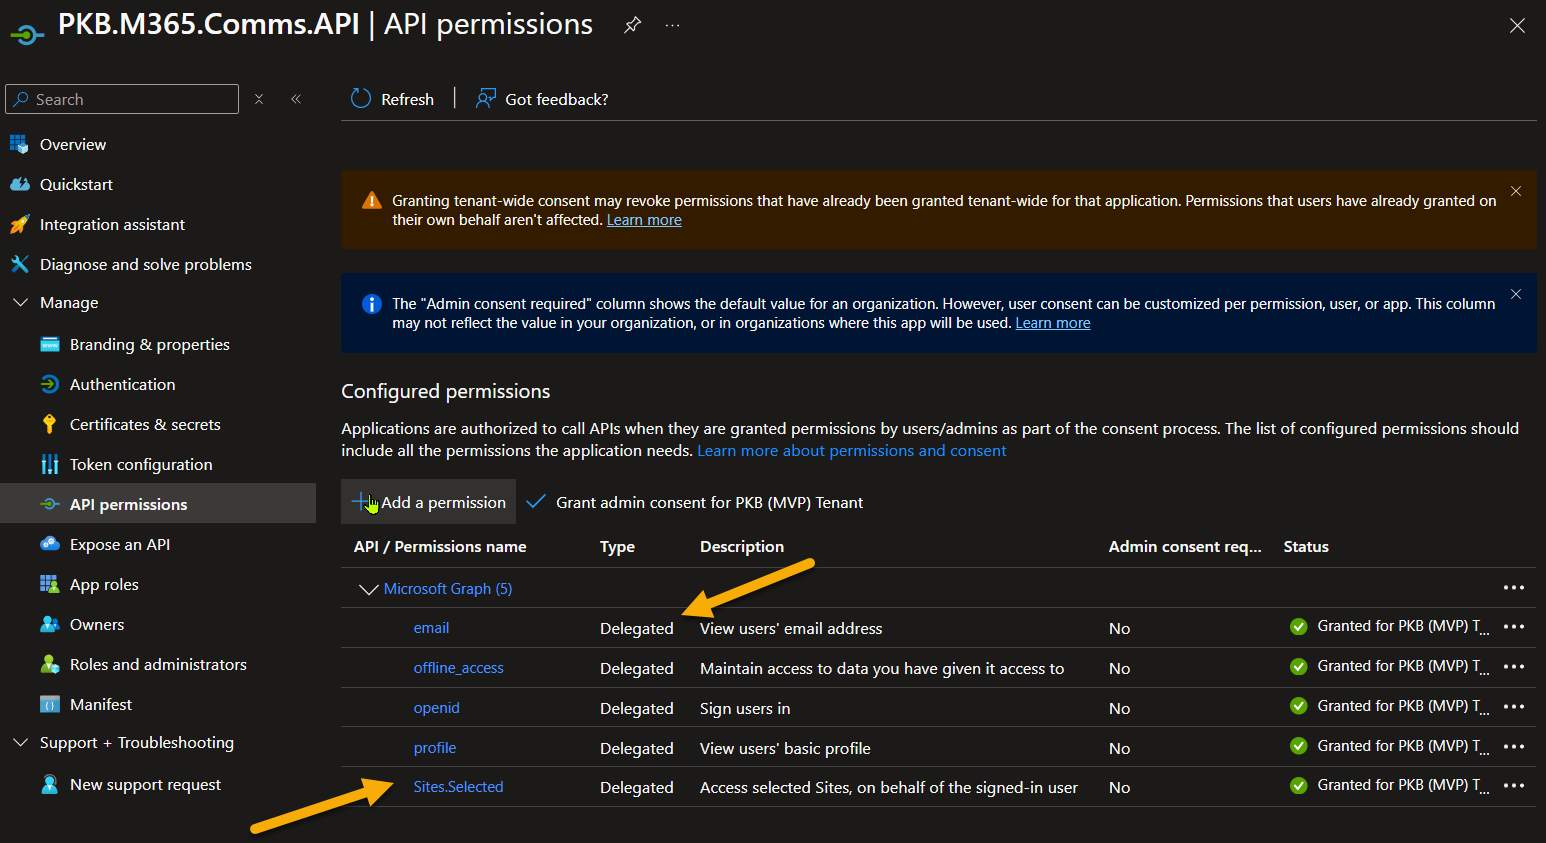
The API permissions are to connect to SharePoint with specific SharePoint sites only using Sites.Selected delegated permission in the Microsoft Graph.
I have added these additional permissions, to ensure that the app can issue refresh tokens when the authentication expires - specially the offline_access permission, that indicates you can request refresh tokens, check out this resource for details: Refresh Tokens | Microsoft Learn & Scopes and permissions in the Microsoft identity platform | Microsoft Learn
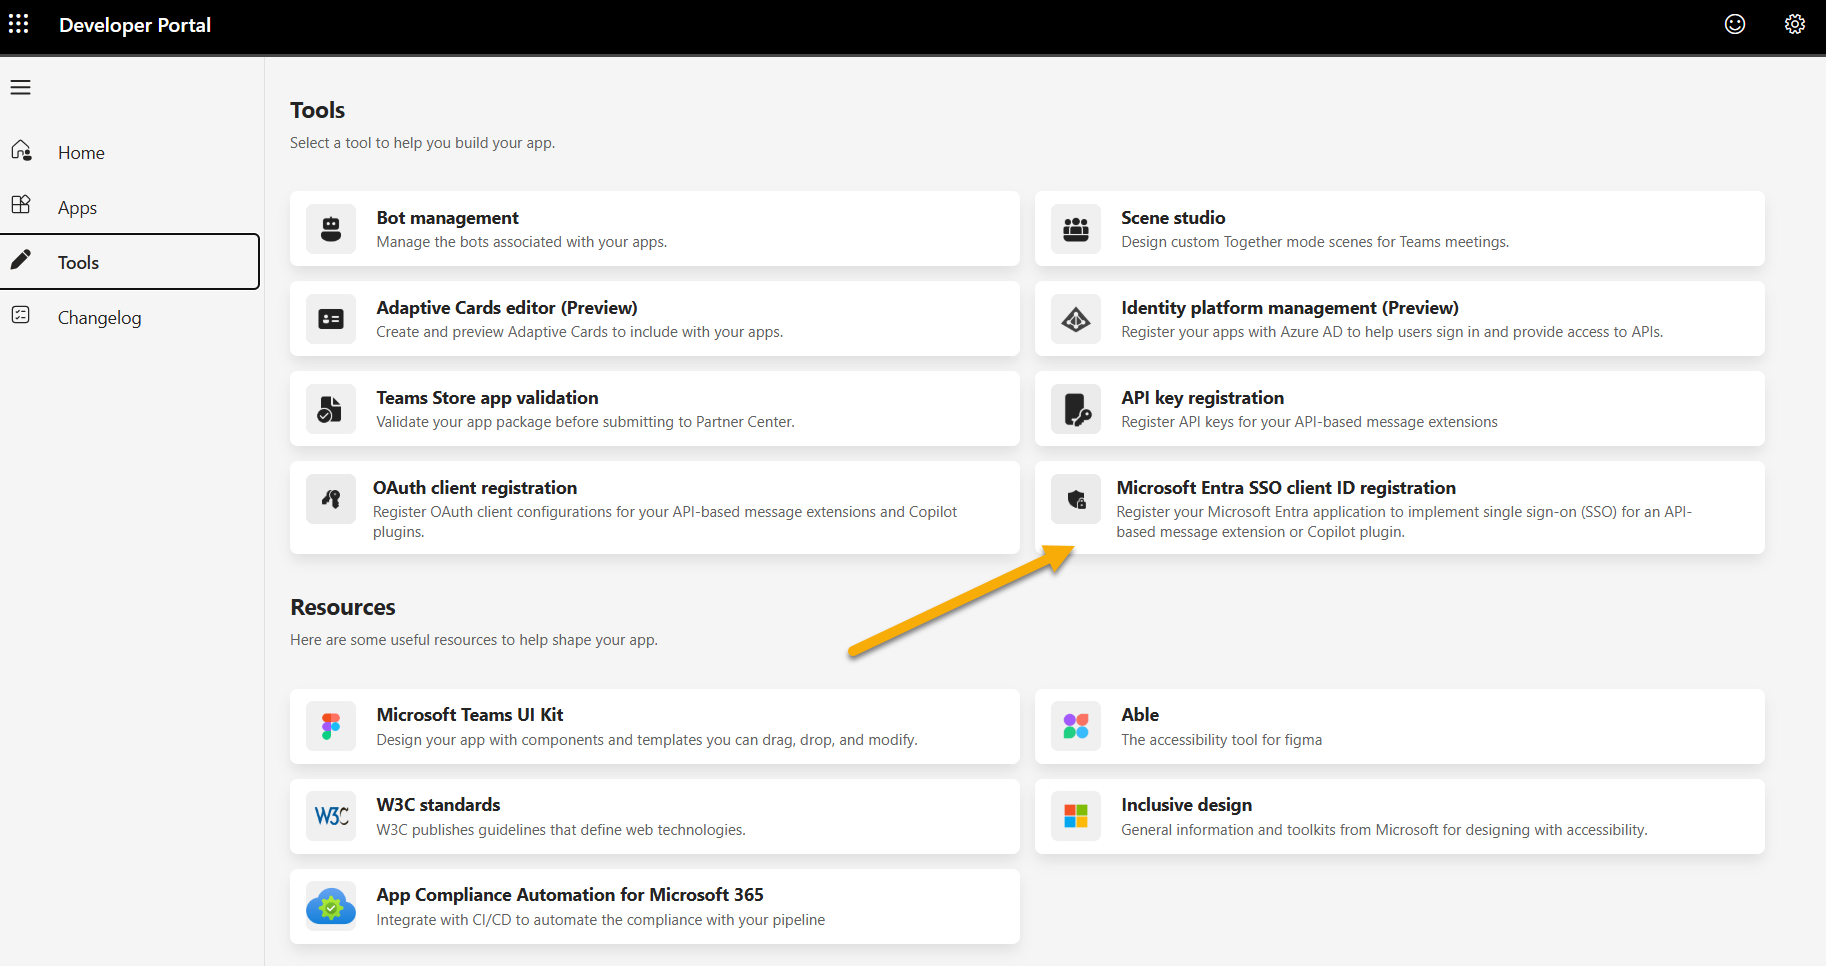
Teams Developer Portal
THe Teams Developer Portal is the place in which your apps are registered with Teams, you have a set of tools and configuration available to you for managing your apps.
Within the Teams developer portal, you can configure authentication and view the manifests if required. Here, this portal you can configure the Enterprise single sign on configuration in https://dev.teams.microsoft.com
Navigate to the screen and complete the form for the application, you will need the Client ID of the Entra ID App used for the Web API to hand.
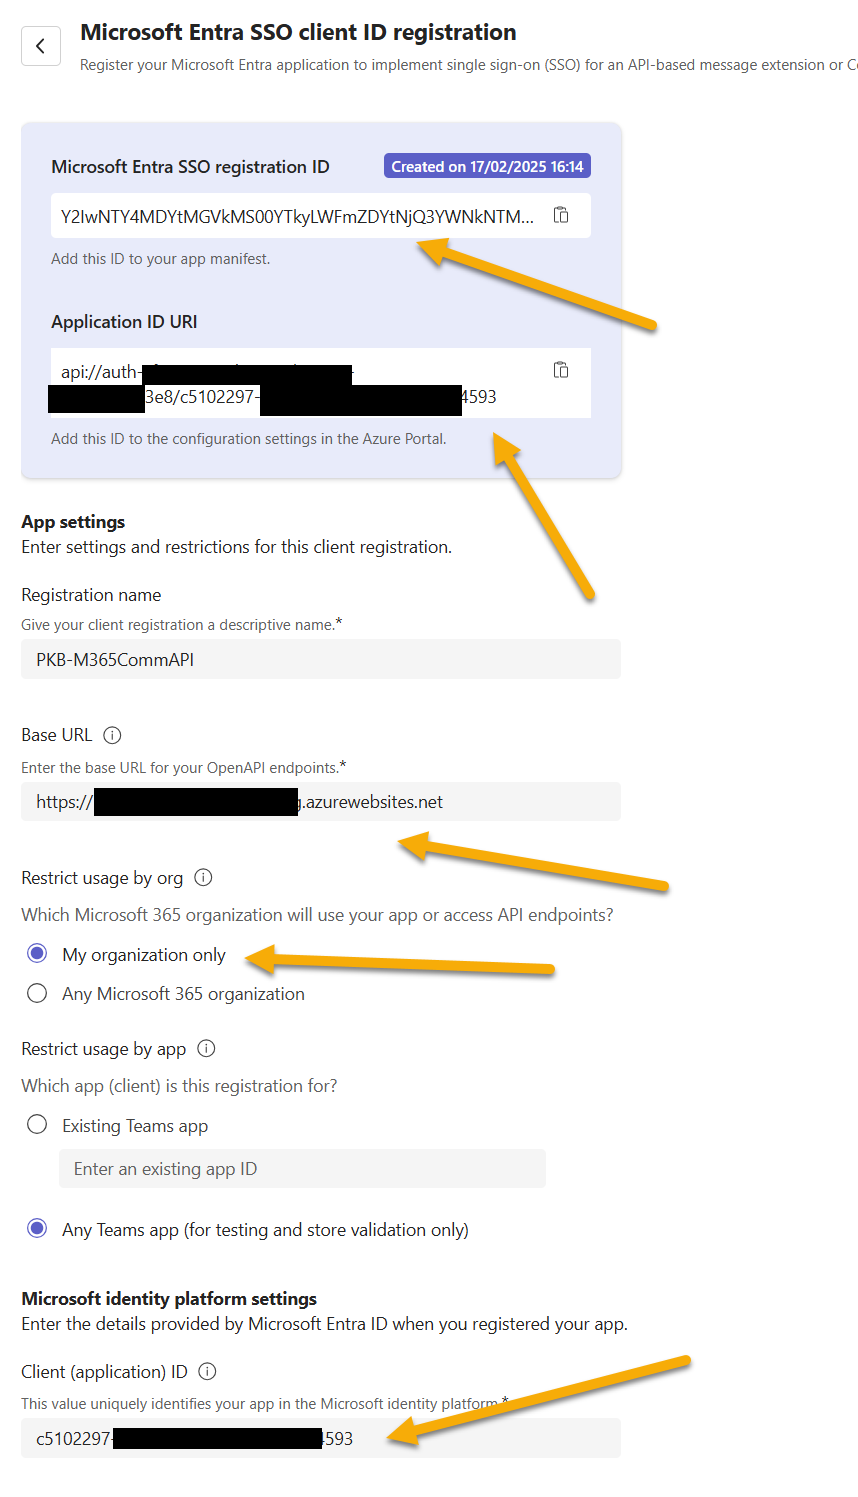
Keep the following for later:
- Application ID URI - this is used to configure the Expose an API section later in the Entra ID app mentioned before.
- Microsoft Entra SSO Registration ID - used in Teams Toolkit later for the connection of Teams app to the Entra ID app.
You are free to change the URL at any point for example, if you wish to use a DevTunnel to call a local debugging of an app, but also ensure the OpenAPI server list is aligned to this API.
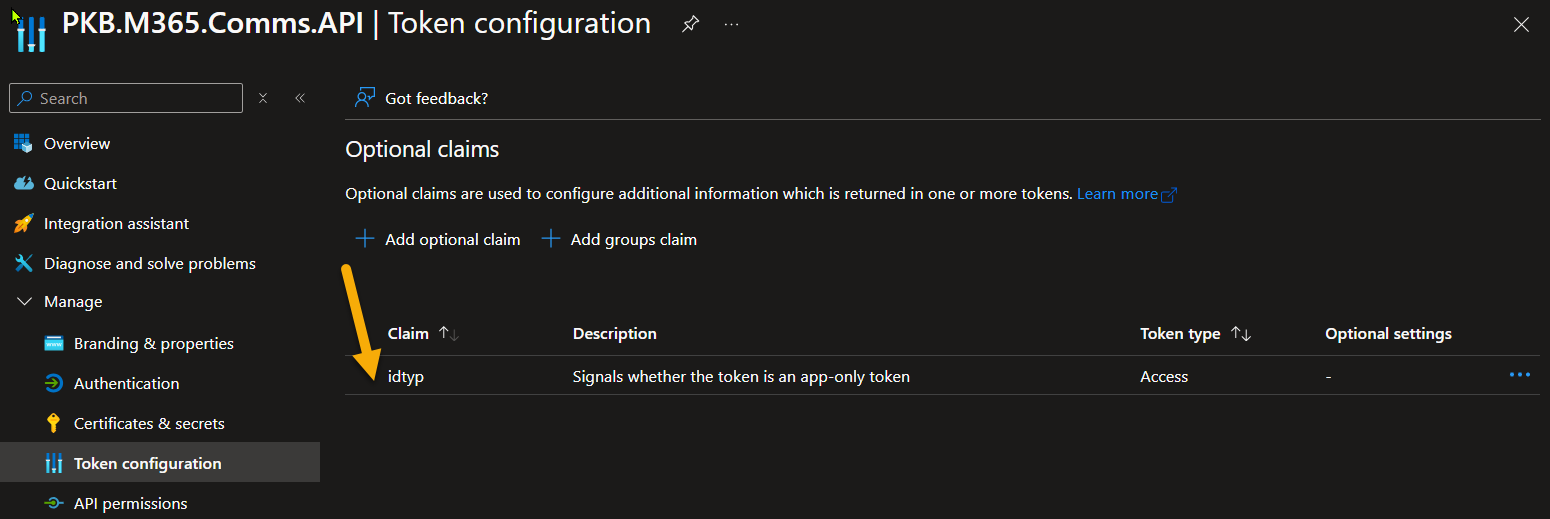
Back to the Entra ID App Configuration
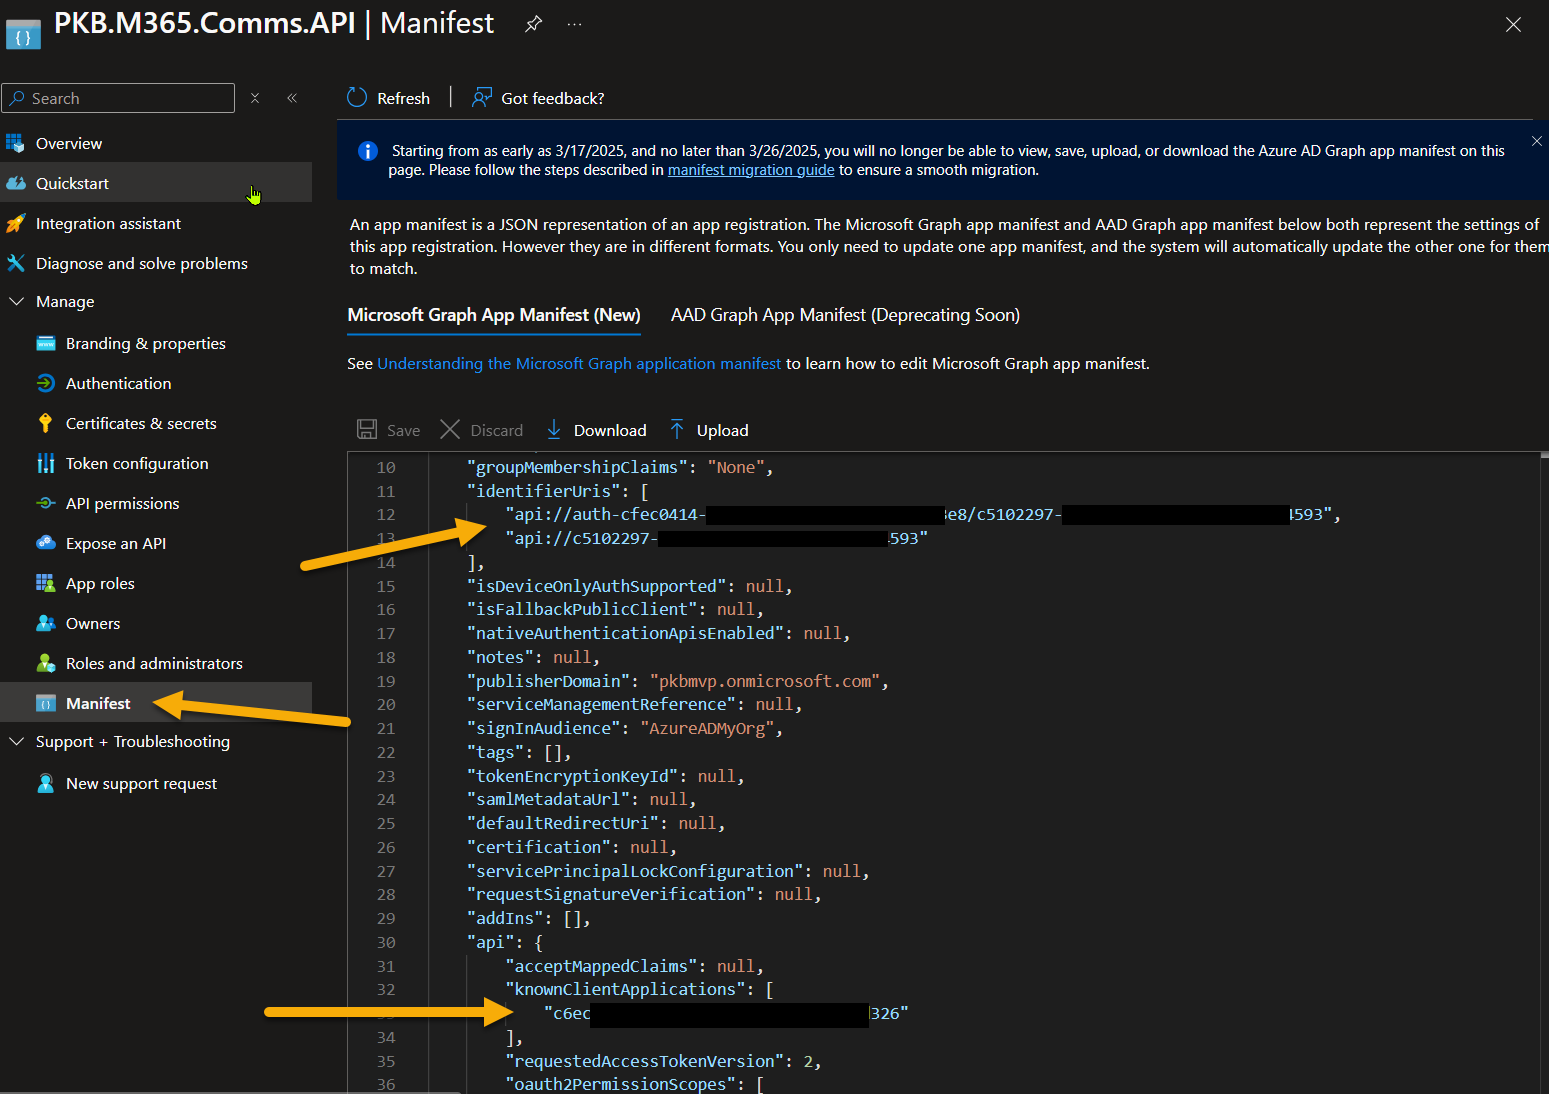
The UI doesn’t support multiple identifier Uri’s, so you need to add this to the app manifest and save it. Specifically, one us used for the API and one used for Teams SSO configuration.
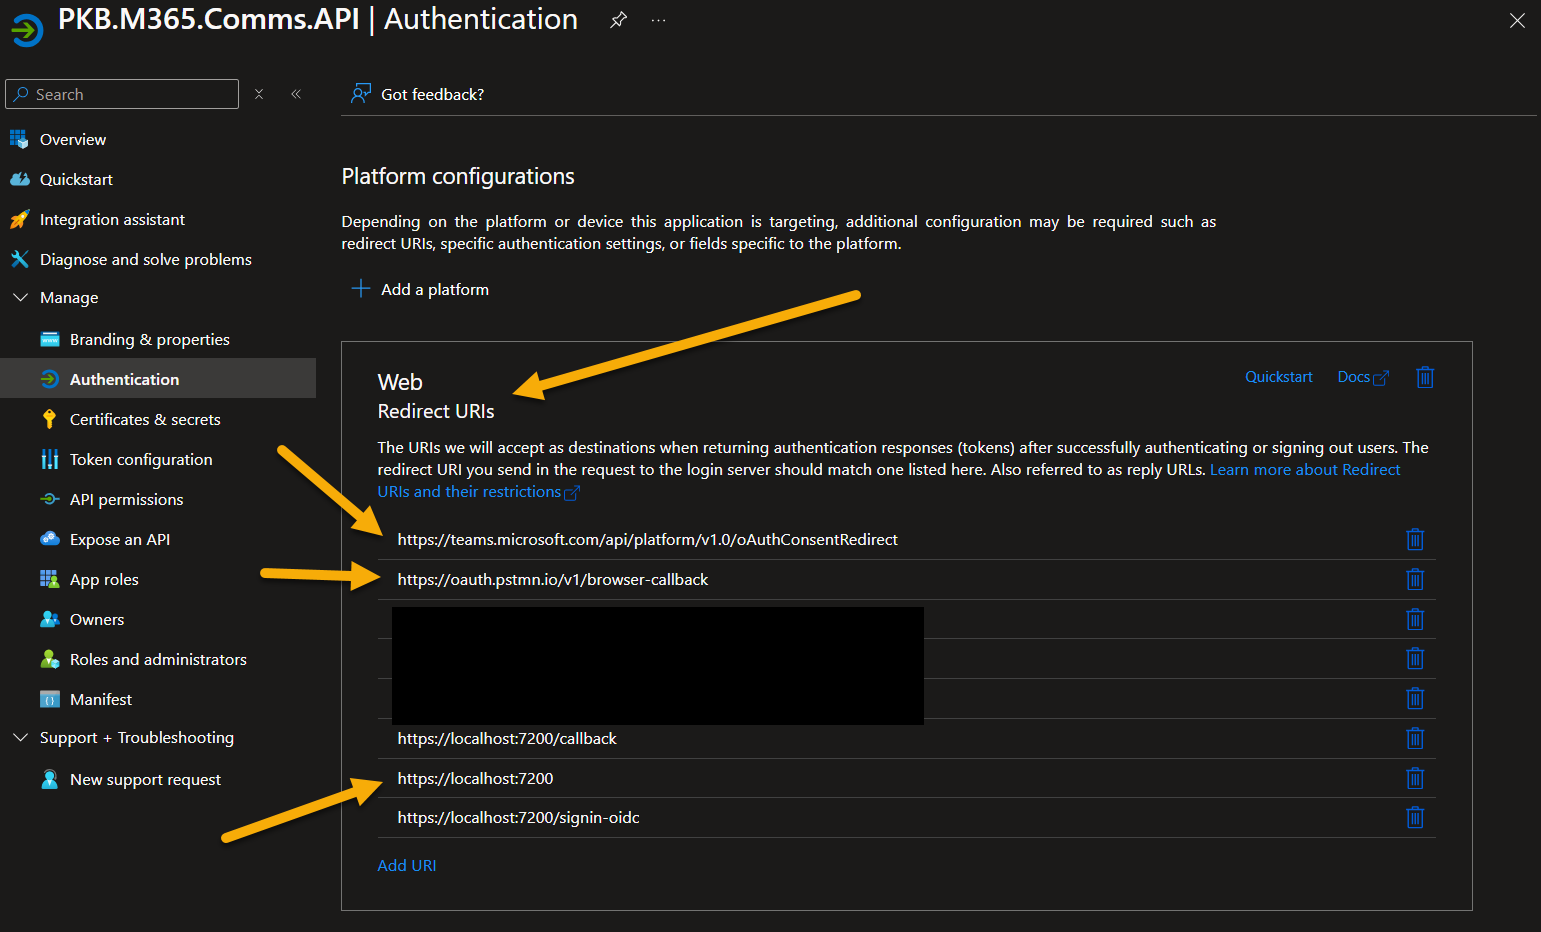
Add the following to Web Redirect:
- https://teams.microsoft.com/api/platform/v1.0/oAuthConsentRedirect
- https://oauth.pstmn.io/v1/browser-callback
The last one you will need to authenticate with Postman (which is a great tool for testing APIs) to validate the web API is responding and can authenticate with your credentials.
Ensure these settings are populated:
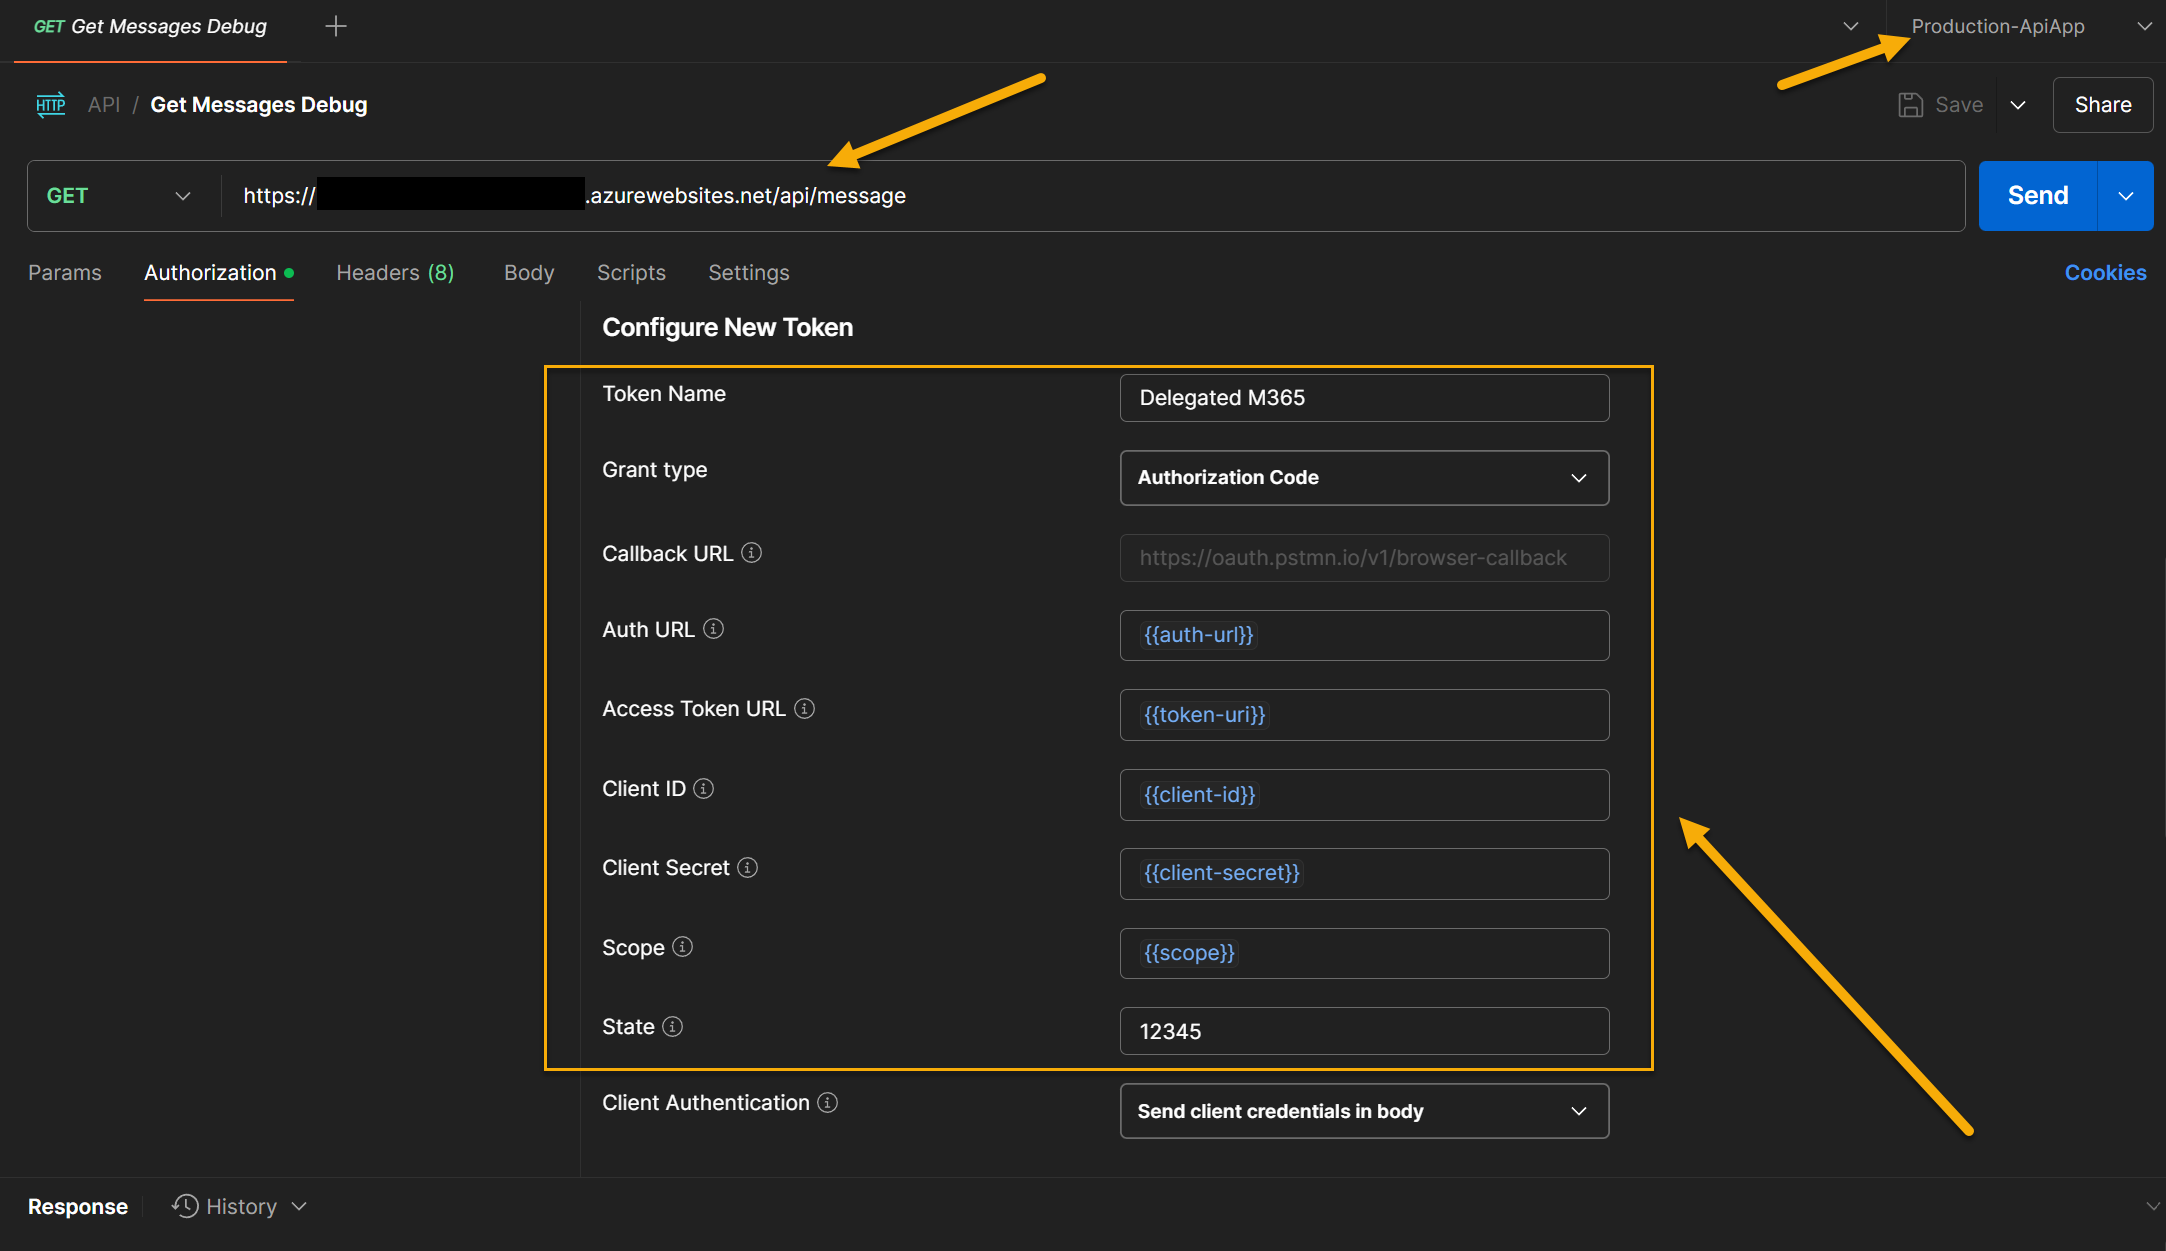
Finally,
Ensure you have configured the “Expose an API” section of the Entra ID App.
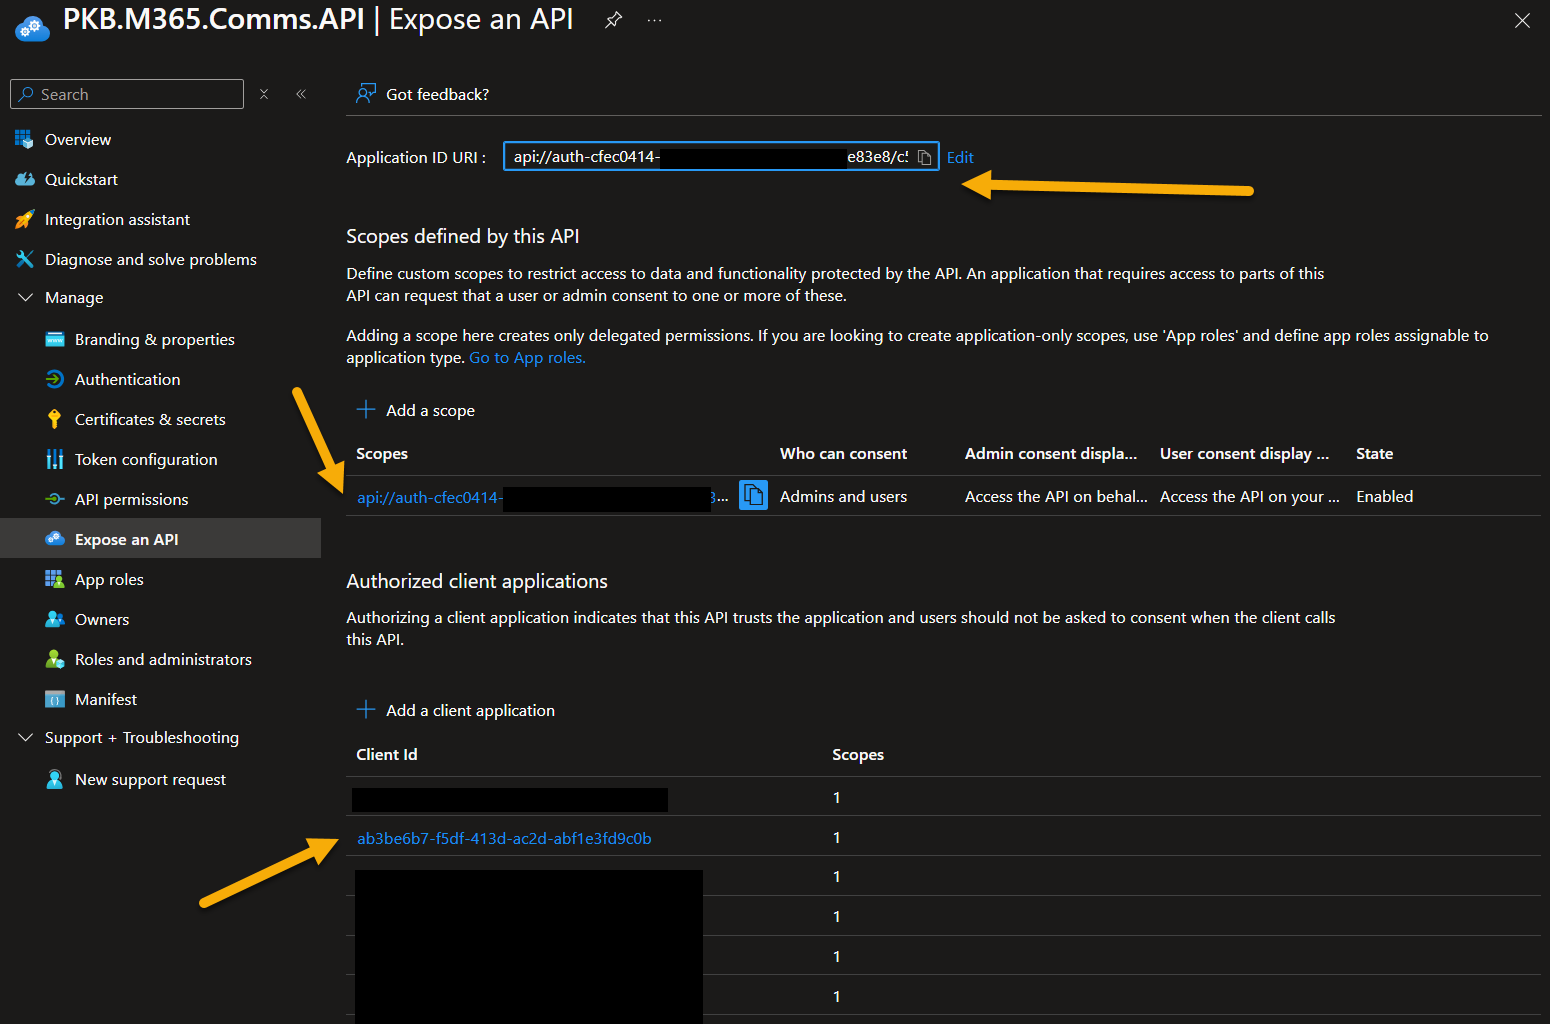
Set the client ID as a known authorized client application.
To see the full setup, check out this document on Microsoft Learn to fully configure this: Microsoft Entra ID SSO authentication | Microsoft Learn
SharePoint Site and Sites.Selected
The final piece to setup, the SharePoint site, create a new one, with a single list with the following columns:
General Configuration
| Property | Value |
|---|---|
| List Title | Communication Queue |
| URL | https://<mytenant>.sharepoint.com/sites/M365CommunicationSite/Lists/Communication%20Queue |
Field Configuration
| Property | Type | Default Values |
|---|---|---|
| Title | Single Line of Text | None |
| MarkdownContent | Multiple Lines of Text | None |
| IsApproved | Choice | Approved, Rejected, Pending, Cancelled, Submitted |
| SendToSharePoint | Yes/No | No |
| SendToTeams | Yes/No | No |
| SendToOutlook | Yes/No | No |
I have included a PnP Provisioning template with the repo, if required.
Then, set the Entra ID app with permissions to the SharePoint site using the following script:
Connect-PnPOnline https://<mytenant>.sharepoint.com/sites/M365CommunicationSite -Interactive -ClientID <AppUsedToConnectToSharePoint>

Grant-PnPAzureADAppSitePermission -AppId <web-api-app-id> -DisplayName "MyApp.M365.Comms.API" -Permissions Write -Site https://<mytenant>.sharepoint.com/sites/M365CommunicationSite
Publishing the code to Azure
For me this was straight forward, within Visual Studio, there are publishing tools to setup and use either GitHub Actions (note this needs some setup, not hard though and well documented) or Publish from Visual Studio to the Azure Web App. The interface here can help setup the Web app if you like, but you will learn more if you try it yourself.
For this example, Publish from Visual Studio option mainly, I had setup both but prefer this during development.
Microsoft 365 Copilot Declarative Agent with API Plugin
For this section, we are going to create an Microsoft 365 Copilot Agent with API Plugin using Teams Toolkit or the Teams CLI if you prefer.
For this section, the source code of the application will be published to the PnP Community Repo here:
Pending merge, but here is a sneaky peak: My Advanced COmmunications Buddy Pull Request | GitHub
Open API Specification
You can generate the OpenAPI specification in the sample, by running the app locally and calling this endpoint https://localhost:<app-port>/openapi/v1.json - this will then give you a JSON response with the specification, save this file locally.
In the Web API, I have tailored the output to use inline references to definitions of the output of the API, I did this looking at why Adaptive cards are not working for me, so might be redundant now.
If you are using the hosted version in Azure, update the OpenAPI specification file, find the servers section and insert the URL of the Azure website address.
Create the agent
Ensure, you have Visual Studio Code and Teams Toolkit extension installed.
Run though the steps for creating a new App, Select Declarative agent, ensure you you select Add an Action, then choose Start with an OpenAPI Description Document, and select the recently downloaded Open API specification, in the next screen, you can choose the operations you wish to map, in this case, all of them, finally run through the name and folder of the application.
Once, this is generated, you will get a Declarative Agent with a few extra files.
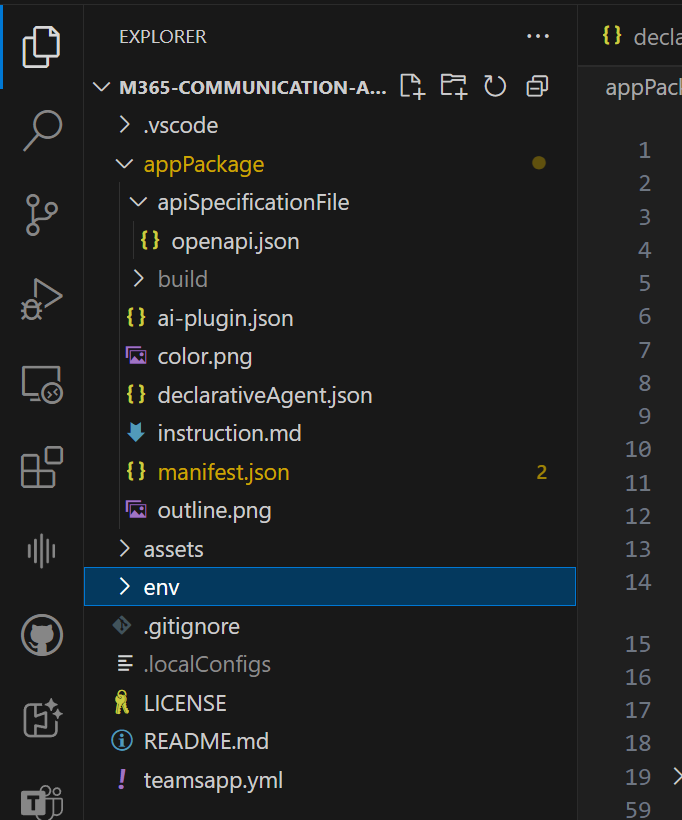
The extra files are:
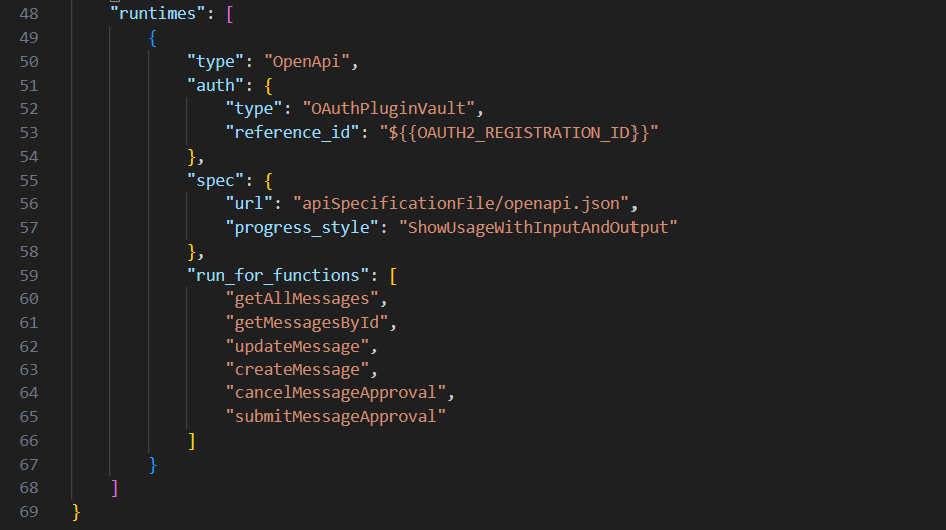
ai-plugin.jsonfile - this contains the configuration between the agent and the API, which contains options for setting Adaptive Cards, selecting the operations, giving good descriptions on the operations (important), and reference to theMicrosoft Entra SSO Registration IDyou have collected earlier
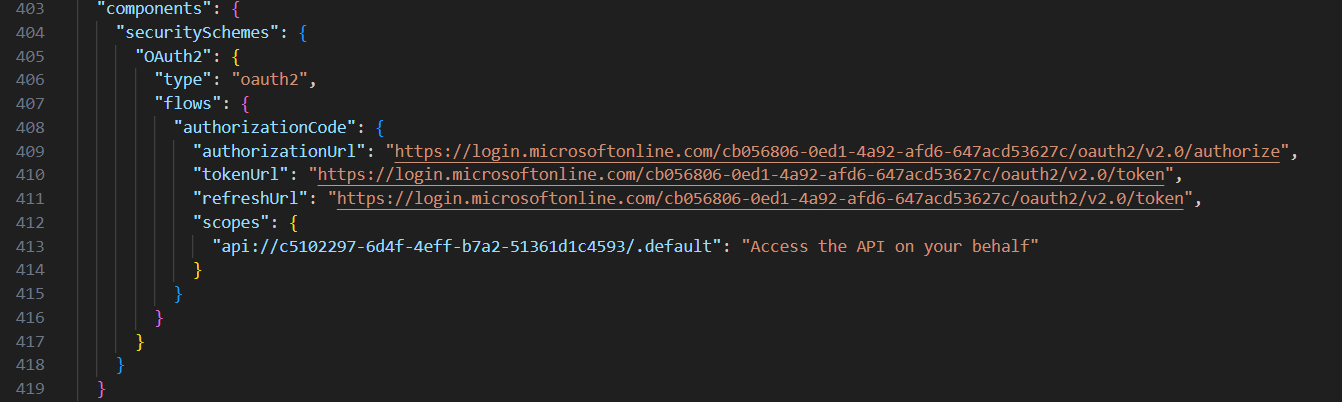
openapi.jsonspecification file, this details the endpoint and includes configuration for the request, response details, the authentication used and the servers. Much is configured for you as part of the import file and if there are problems, you light find tweaking this file to ensure Copilot is responding as you would expect.
For authentication, these key areas need to be adjusted:
I have also taken care in writing the instructions.md file (I renamed from txt following a tip from the community), and descriptions to plan out the behavior of the app according to the business scenario.
Rather than explain step by step the configuration, there is a Code Tour in the sample code that can walk through the details.
Provision the app
Finally, provision the app, which you can do with the Provision option in the Teams Toolkit extension.
In Microsoft 365 Copilot Chat Agents experience, when you use this for the first time e.g. enter a prompt to trigger use of the action, for example, “List Messages”, you may have to consent to the permissions and when interacting with the API, proceed accordingly, thereafter, you will get confirmation dialogs to check what data is being sent to the API, keeping that human in the loop.
Problems and Issues I have encountered along the way
Along the way there were a few bumps and bruises, which is all part of learning, but these two areas I wanted to highlight.
403 Errors - pain in the **** to resolve
I had this odd issue, are starting the Web API App in Azure, I could authenticate but after a period of 30 minutes or so, it would start to generate 403 errors. It turns out by using the App Services - Authentication service, seemed to be the problem and after disabling this, it uses authentication in the app, appeared to resolve the issue whilst maintained Single Sign On behavior.
If you have any ideas, I have a discussion thread here: Web API + .NET 9 + PnP Core SDK + Delegated Permissions #1612 | PnP Core SDK on GitHub
This issue burned ALOT of my time, I cannot yet fully explain why, which I don’t like not fully understanding what I am missing - but at the same time happy that I can move forward with the project.
Adaptive Cards
I have not yet added adaptive cards, I had tried but these are very fiddly to get in place and would not render for me. I’m sure it a problem between the computer and the chair, when I figure this out why, I’ll post the learnings.
The developer tools would indicate HTTP 200 OK, on the API endpoint, but the prompt response indicates an error occurred with no actionable information 🤦♂️
Conclusion
Why didn’t I create a button to deploy all of this, well, I could do, but for learning I like to try and do some tasks manually to fully understand how components hang together. Teams Toolkit have now released a Entra ID mode to auth which I believe can setup some of the configuration for you.
The pattern whilst seems complicated hopefully would represent a more enterprise level of configuration that you may use in your projects - its not the complete story, for example,
- Manage credentials - any client secrets could be done with certificates and/or using Key Vaults where necessary
- Validate security, check the app to ensure it’s security hardened
- Configured to scale according to user demand if you publish the app to your organisation
- Logging and Monitoring of the API service to ensure it is performing as expected.
- Better CI/CD, Visual Studio gives you GitHub actions, so having one for the API one for Agent would allow for better release control.
Extra call out to Rabia Williams, Developer Advocate at Microsoft, Ejaz Hussain and the authors of Copilot Camp - I found the camp, samples and sign-posting all contributed strongly, to getting this operational - THANK YOU! 🙏
Resources
The following resource could be useful for you to learn further:
- Copilot Developer Camp
- Copilot Developer Camp - Add Entra ID authentication with Single Sign-on
- Creating a custom Authentication Provider for PnP.Core | PnP Core SDK
- Create web APIs with ASP.NET Core | Microsoft Learn
- Generate OpenAPI documents | Microsoft Learn
- PnP Core SDK - Blazor Sample
- Microsoft 365 Copilot extensibility
- Build API plugins from an existing API for Microsoft 365 Copilot
- Configure authentication for API plugins in agents
Enjoy!